TVM编译模型(yolov3_tf的例子解读)
本篇主要记录一下TVM编译yolov3_tf模型的例子,FPGA开发板:zcu102
一、主机前置环境安装
即setup_custom_yolov3.sh这个脚本,下面是详细内容,部分文件以及git仓库是我预先下载好的,以cp取代下载。下面的脚本主要就是:下载了yolov3_coco.tar.gz(即checkpoint文件),解压至checkpoint文件夹。然后利用convert_weight.py将相关权重文件转换为pb格式。使用freeze_graph.py将模型文件和权重数据整合在一起并去除无关的op。最后将整合的tf模型转换为ONNX格式(如代码块后的图所示)
. $VAI_ROOT/conda/etc/profile.d/conda.sh
conda activate vitis-ai-tensorflow

/opt/vitis_ai/conda/envs/vitis-ai-tensorflow/bin/python3.6 -m pip install --upgrade pip
# 加了个换源操作,方便后面pip安装
pip config set global.index-url https://pypi.tuna.tsinghua.edu.cn/simple
pip install pydot==1.4.1
if [ ! -d "/tmp/tensorflow-yolov3" ]; then
    cp -rf tensorflow-yolov3 /tmp/
    cp yolov3_coco.tar.gz /tmp/
    cd /tmp/
    # git clone https://github.com/YunYang1994/tensorflow-yolov3
    # git clone https://gitee.com/mirrors_YunYang1994/tensorflow-yolov3
    cd tensorflow-yolov3
    pip install easydict --user
    cd checkpoint
    # wget https://github.com/YunYang1994/tensorflow-yolov3/releases/download/v1.0/yolov3_coco.tar.gz
    #wget https://a.y8j5.top/s/A58q3fK
    #mv A58q3fK yolov3_coco.tar.gz
    cp /tmp/yolov3_coco.tar.gz .
    tar -xvf yolov3_coco.tar.gz
    cd ..
    python convert_weight.py
    python freeze_graph.py
    sed -i 's/.\//\/tmp\/tensorflow-yolov3\//' ./core/config.py
    # CONVERT TENSORFLOW MODEL TO ONNX
    pip install numpy==1.16.6 --user
    pip install onnx --user
    # cd "${TVM_VAI_HOME}"/tensorflow-yolov3
    # git clone https://github.com/onnx/tensorflow-onnx.git
    cd tensorflow-onnx && python setup.py install --user && cd ..
    python3 -m tf2onnx.convert --input ./yolov3_coco.pb --inputs input/input_data:0[1,320,320,3] --outputs pred_sbbox/concat_2:0 --output tf_yolov3_converted.onnx
fi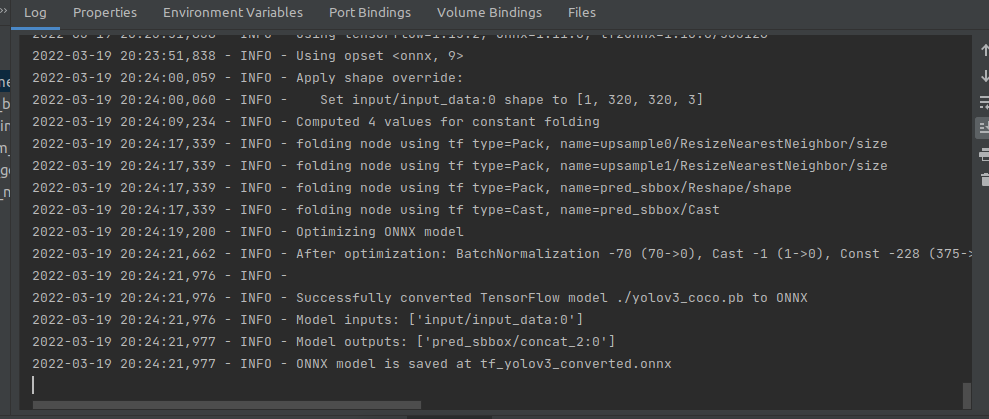
二、编译模型
模型的编译部分其实和之前的mxnet的编译类似,相同的地方不在重复。https://github.com/Xilinx/Vitis-AI/blob/master/external/tvm/examples/external_yolov3_tutorial.ipynb 官方的jupyter book有详尽的步骤,但是在jupyter上容易达成kernel died。因此,转换为一个python脚本在本地命令行执行(内存占用极大)。下面的各个代码块即是完整的py脚本,连起来可以直接运行。
1. import
"""
-------------------------------------------------
Import packages
-------------------------------------------------
"""

import numpy as np
import os, sys
import os.path
# 注意到这里导入了tf
import tensorflow as tf
from pathlib import Path

# pyxir
import pyxir
import pyxir.contrib.target.DPUCADF8H

# tvm, relay
import tvm
from tvm import te
from tvm import contrib
import tvm.relay as relay


# BYOC
from tvm.relay import transform
from tvm.contrib import utils, graph_executor
from tvm.contrib.target import vitis_ai
from tvm.relay.build_module import bind_params_by_name
from tvm.relay.op.contrib.vitis_ai import annotation
# Tensorflow utility functions
import tvm.relay.testing.tf as tf_testing
from tvm.contrib.download import download_testdata
from tvm.relay.op.contrib.vitis_ai import partition_for_vitis_ai


import cv2

try:
    tf_compat_v1 = tf.compat.v1
except ImportError:
    tf_compat_v1 = tf
2. yolov3相关预处理函数
这部分其实在编译模型阶段没有很重要,甚至可以不需要,只是在编译生成模型的时候需要得到mod, params = relay.frontend.from_onnx(onnx_model, shape_dict)中的shape_dict,这个步骤在知道网络输入格式后甚至可以直接设置为指定的,比如yolo+csl中[1024*1024].
-------------------------------------------------
Define preprocessing functions
定义了一些有关yolov3_tf模型的预处理函数
-------------------------------------------------
"""
def preprocessing(image):
image = cv2.cvtColor(image, cv2.COLOR_BGR2RGB).astype(np.float32)
ih, iw = (320,320)
h, w, _ = image.shape
scale = min(iw/w, ih/h)
nw, nh = int(scale * w), int(scale * h)
image_resized = cv2.resize(image, (nw, nh))
image_padded = np.full(shape=[ih, iw, 3], fill_value=128.0)
dw, dh = (iw - nw) // 2, (ih-nh) // 2
image_padded[dh:nh+dh, dw:nw+dw, :] = image_resized
image_padded = image_padded / 255.
return image_padded
def transform_image(image):
image = np.array(image)[np.newaxis, :]
return image
```
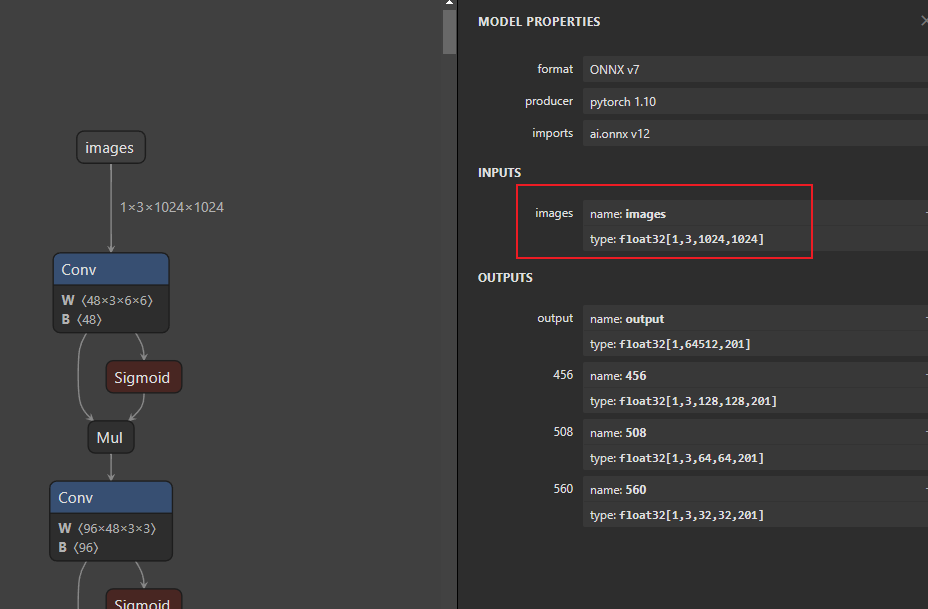
#### 3. 准备输入,声明DPU目标
  这里的input_name可以在 https://netron.app/ 网站上打开ONNX模型查看,如图(yolov5+csl的转ONNX模型):
``` python
"""
-------------------------------------------------
Prepare input and specify the Vitis DPU target
-------------------------------------------------
"""
from PIL import Image
img_path = "/tmp/tensorflow-yolov3/docs/images/road.jpeg"
original_image = cv2.imread(img_path)
image = preprocessing(original_image)
image = np.array(image)[np.newaxis, :]
# 这里的image.shape是[1, 320, 320, 3]和onnx打开模型所观察到的一致
v_target_value = "DPUCZDX8G-zcu102"
print("Vitis Target: ", v_target_value)
input_name = 'input/input_data'
shape_dict = {input_name: image.shape}
postprocessing = []
vitis_target = v_target_value
tvm_target = 'llvm'
lib_kwargs = {}4. 导入模型
"""
-------------------------------------------------
Import the model to TVM
-------------------------------------------------
"""
framework_value = "ONNX"
print ("Framework: ", framework_value)
if framework_value == "TF":
    model_path = "/tmp/tensorflow-yolov3/yolov3_coco.pb"
    with tf_compat_v1.gfile.GFile(model_path, "rb") as f:
        graph_def = tf_compat_v1.GraphDef()
        graph_def.ParseFromString(f.read())
        graph = tf.import_graph_def(graph_def, name="")
        # Call the utility to import the graph definition into default graph.
        graph_def = tf_testing.ProcessGraphDefParam(graph_def)
        # Add shapes to the graph.
        with tf_compat_v1.Session() as sess:
            graph_def = tf_testing.AddShapesToGraphDef(sess, "pred_sbbox/concat_2")
    mod, params = relay.frontend.from_tensorflow(graph_def, shape=shape_dict)
    print("Tensorflow protobuf imported to relay frontend.")

else:
    import onnx
    input_name     = 'input/input_data:0'
    shape_dict     = {input_name: image.shape}
    model_path = "/tmp/tensorflow-yolov3/tf_yolov3_converted.onnx"
    onnx_model = onnx.load(model_path)
    mod, params = relay.frontend.from_onnx(onnx_model, shape_dict)
```
#### 5. Partitioning the model
```  python
"""
-------------------------------------------------
Partitioning the model
-------------------------------------------------
"""

mod = partition_for_vitis_ai(mod, params, dpu=vitis_target)
6. Build the partitioned TVM module
"""
-------------------------------------------------
Build the partitioned TVM module
-------------------------------------------------
"""
export_rt_mod_file = os.path.join(os.getcwd(), 'vitis_ai.rtmod')

build_options = {
'dpu': vitis_target,
'export_runtime_module': export_rt_mod_file
}

with tvm.transform.PassContext(opt_level=3, config={'relay.ext.vitis_ai.options': build_options}):
lib = relay.build(mod, tvm_target, params=params)
7. 量化模型
"""
-------------------------------------------------
Quantize the model
-------------------------------------------------
"""
QUANT_DIR = os.path.join("/opt/tvm-vai", "CK-TOOLS/dataset-imagenet-ilsvrc2012-val-min/")

def inputs_func(img_files):
inputs = []
for img_path in img_files:
    image = cv2.imread(img_path)
    image = cv2.cvtColor(image, cv2.COLOR_BGR2RGB)
    image = preprocessing(image)

    inputs.append(transform_image(image))
return inputs


print("Create InferenceSession for OTF Quantization")
module = graph_executor.GraphModule(lib["default"](tvm.cpu()))

# px_quant_size = int(os.environ['PX_QUANT_SIZE']) \
#     if 'PX_QUANT_SIZE' in os.environ else 128
px_quant_size = 128

print("Start OTF Quantization on first {} images".format(px_quant_size))

quant_files = [os.path.join(QUANT_DIR, f) for f in os.listdir(QUANT_DIR)
         if f.endswith(('JPEG', 'jpg', 'png'))][:px_quant_size]
quant_images = inputs_func(quant_files)
print('Loaded {} inputs successfully.'.format(len(quant_images)))

for i in range(px_quant_size):
module.set_input(input_name, quant_images[i])
module.run()
8. 导出模型
"""
-------------------------------------------------
Export and run on a Zynq edge device
-------------------------------------------------
"""
if vitis_target.startswith('DPUCZDX8G'):

# Export runtime module
temp = utils.tempdir()
lib.export_library(temp.relpath("tvm_lib.so"))

# Build and export lib for aarch64 target
tvm_target = tvm.target.arm_cpu('ultra96')
lib_kwargs = {
    'fcompile': contrib.cc.create_shared,
    'cc': "/usr/aarch64-linux-gnu/bin/ld"
}
build_options = {
    'load_runtime_module': export_rt_mod_file
}

with tvm.transform.PassContext(opt_level=3, config={'relay.ext.vitis_ai.options': build_options}):
    lib_dpuczdx8g = relay.build(mod, tvm_target, params=params)

lib_dpuczdx8g.export_library('tvm_dpu_cpu.so', **lib_kwargs)

else:
lib.export_library('tvm_dpu_cpu.so')

print("Finished storing the compiled model as tvm_dpu_cpu.so")

print("Finished OTF Quantization")
三、推理
推理过程主要包括一下步骤:
注意框架参数选择TF/ONNX(默认TF)
图像预处理 =>
加载模型 => model.run
后处理(包括bounding box的nms以及图片写回等)
下图是在zcu102上的测试运行结果

本博客所有文章除特别声明外,均采用 CC BY-NC-SA 4.0 许可协议。转载请注明来自 不听话的兔子君!