TVM环境搭建
本篇主要记录一下TVM环境搭建过程,FPGA开发板:zcu102
一、主机环境搭建
大部分的流程跟着官方文档:https://tvm.apache.org/docs/how_to/deploy/vitis_ai.html, 这篇的内容是利用Vitis-AI环境去搭建安装VTM。这里重点记录一些需要注意的地方。
1.docker相关
1.1 docker容器拉取
利用docker去pull官方的container(容器)的时候可以换源来加速(由于要下载的内容较多,科学上网中途可能因为安全问题被断开连接)。daocloud的加速教程:http://guide.daocloud.io/dcs/daocloud-9153151.html#docker-toolbox
1.2 GPG ERROR
GPG error: https://apt.kitware.com/ubuntu bionic InRelease:
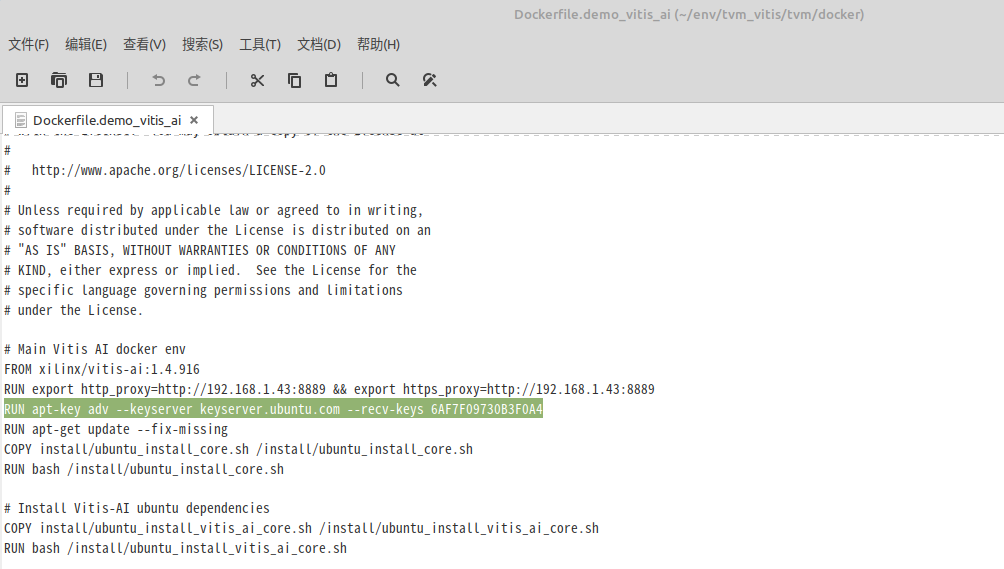
The following signatures couldn't be verified because the public kev is not available: NO_PUBKEY 6AF7F99730B3F0A4
```
  按照网上教程直接在命令行输入:RUN apt-key adv --keyserver keyserver.ubuntu.com --recv-keys 6AF7F09730B3F0A4 会提示**failed**。应该在**Dockerfile.demo_vitis_ai**文件中作如图修改,另外注意在脚本执行到这一句的时候不要用科学上网,之后获取ubuntu的archrive的时候科学上网会快一点,在此处会直接导致脚本执行失败。
##### 1.3 python版本错误
```
This script does not work on Python 3.6 The minimum supported Python version is 3.7. Please use https://bootstrap.pypa.io/pip/3.6/get-pip.py instead.
The command '/bin/sh -c bash /install/ubuntu_install_python.sh' returned a non-zero code: 1
解决:
修改tvm/docker/install/ubuntu_install_python.sh 中https链接为错误提示链接。
即:
# 修改前(line:36~37):
# Install pip
cd /tmp && wget -q https://bootstrap.pypa.io/get-pip.py && python3.6 get-pip.py
# 修改后(line:36~37):
# Install pip
cd /tmp && wget -q https://bootstrap.pypa.io/pip/3.6/get-pip.py && python3.6 get-pip.py
```
#### 2.TVM build相关
#### 2.1 cmake错误 CMake Error at /opt/vitis_at/conda/envs/vitis-ai-pytorch/lib/cmake/GTest/GTestTargets. cmake:103 (message):
The imported target "GTest:: gmock"references the file
“/opt/vitis_ai/conda/envs/vitis-at-pytorch/lib/libgmock. so”
but this file does not extst. Possible reasons include:
解决:
根据github上的issue:https://github.com/apache/tvm/issues/9772
修改 tvm/cmake/config.cmake(Line 359)
ORIGINAL:set(USE_GTEST AUTO)
UPDATE: set(USE_GTEST OFF)
#### 2.2 pytorch环境下,cmake错误
```
CMake Error at cmake/modules/contrib/VitisAI.cmake:36 (message):
  Can't build TVM with Vitis-AI because PyXIR can't be found
Call Stack (most recent call first):
CMakeLists.txt:479 (include)在tensorflow环境下不会报错,两者python版本一致(3.6)。在python命令行中尝试import pyxir,同样也是在tensorflow环境中正确导入而在pytorch环境中提示无法找到。暂时没有解决。最终还是在tf环境下完成了TVM的安装。
二、target环境搭建
一开始没有找到官方文档(或者说不是适配的官方文档,https://www.xilinx.com/htmldocs/vitis_ai/1_4/installation.html#ariaid-title8 这篇Xilinx官网的文档显然不适合本次搭建用的image,同时这个链接的教程中提供的image就是要用的)。遇到了一些问题:时间不符合(newly created file is older…),wegt的时候certificate不被信任(直接在命令后加上 --no-check-certificate即可)。部分问题可通过走下面的流程避免:
正确的流程是跟着github上的指南:https://github.com/Xilinx/Vitis-AI/blob/master/external/tvm/docs/running_on_zynq.md 其中提供了petalinux setup script。这个脚本给出了完整的安装TVM的runtime的流程。
需要注意的是:
# Set date/time
date -s "$(wget -qSO- --max-redirect=0 google.com 2>&1 | grep Date: | cut -d' ' -f5-8)Z"
# 设置时间,如果没有科学上网,把谷歌网址改成百度。

# INSTALL PIP3
sudo dnf install -y python3-pip
由于image中是不带pip的,脚本中提供了如上命令去安装pip3;
但是这个命令会转到Xilinx的某个404网站,即 http://petalinux.xilinx.com/sswreleases/rel-v2021.1/generic/rpm/zynqmpeg/repodata/repomd.xml
因此用还是用python3 get-pip.py的方式本地编译生成pip3,这个过程将会持续很长时间
此外,由于过程中使用了一些gitee上同步的仓库,部分文件内容不一致,导致最终cmake过程中报错:declaration conflict。 需要找到相应第三方包,和官方仓库比对,覆盖。
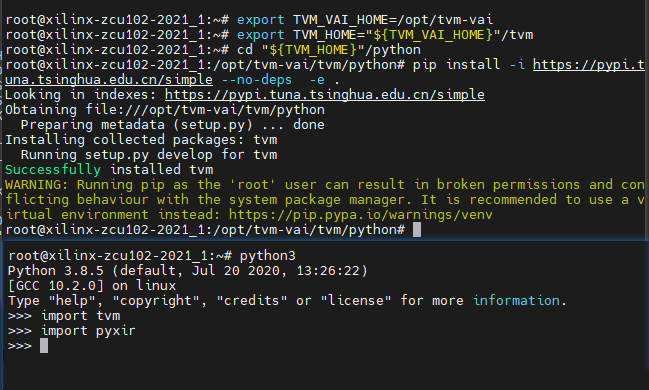
下面是安装结束后导入tvm以及pyxir均无问题。